- Starter
- Business
- Enterprise
- On-Premise
- Add-on
Overview
This article outlines how to install, configure and monitor the remote Integration Agent.
Add new Integration Agent
Step 1. Open Agentswindow. Click Add Agent button.
Step 2. Enter the Agent name, click Save.
Managing Integration Agents
The Agents page allows you to monitor, control, and maintain all Integration Agents connected to your Etlworks environment.
From this page you can:
- View the status and health of each Agent
- Start, stop, or restart Agents
- Monitor Agent version, OS, IP address, and updater status
- Suspend Agents temporarily
- Update Agents individually or in bulk
- Duplicate or delete Agents
- Access Agent diagnostics and logs
Table and Card Views
The Agents page supports two visual layouts for browsing and managing Integration Agents: Card view and Table view.
You can switch between views using the view selector in the toolbar.
Card View
(default)
Card view displays each Agent as an individual card with detailed information.
Each card shows:
- Agent name
- Operating system
- Agent version IP address
- Agent status (Online / Offline)
- Updater status (Running / Stopped)
Card view also provides quick actions such as:
- Start or stop the Agent
- Restart the Agent
- Download logs
- View Agent status
- Suspend or resume the Agent
- Delete the Agent
Card view is useful when monitoring Agent health and quickly accessing Agent controls.
Table View
Table view displays Agents in a compact grid format.
Each row shows key Agent information, including:
- Agent name
- Operating system
- Version
- IP address
- Status
- Updater status
Table view is optimized for environments with many Agents and works well with sorting, filtering, and bulk operations.
Switching between views does not affect Agent configuration or operation.
Context Menu (Right-Click Menu)
You can quickly manage Agents using the right-click context menu.
To open the menu:
- Navigate to the Agents page.
- Right-click an Agent in the grid.
For a single Agent, the context menu provides the following actions:
- Open agent – opens the Agent configuration screen.
- View status – opens the Agent monitoring dashboard.
- Duplicate agent – creates a copy of the Agent configuration.
- Delete agent – removes the Agent.
When multiple Agents are selected, the menu also provides bulk actions such as:
- Bulk update selected agents
- Advanced options Delete selected agents
The context menu provides a fast way to manage Agents directly from the grid without opening the Agent editor.
Bulk Operations on Agents
The Agents page supports bulk operations that allow you to manage multiple Agents simultaneously. This is particularly useful when working with environments that contain many Integration Agents.
To perform bulk actions:
- Navigate to the Agents page.
- Select one or more Agents.
- Open the Actions menu or use the right-click context menu.
- Choose one of the available operations.
Available bulk actions include:
- Bulk update selected agents – update multiple Agents to a selected version.
- Advanced options – opens the Bulk Actions dialog with additional configuration options.
- Delete selected agents – removes all selected Agents.
Bulk Agent Update
The Bulk Agent Update dialog allows updating multiple Agents at the same time.
When starting a bulk update:
- Select the Agent version to install.
- Optionally review the Release Notes.
Before the update begins, Etlworks validates the selected Agents and displays the validation results, indicating:
- Agents that are eligible for update
- Agents that already run the selected version
- Agents that cannot be updated (for example, if the Agent is offline)
Only eligible Agents will be updated.
When the update starts, each Agent downloads the update package, installs the new version, and restarts automatically.
Bulk updates significantly simplify maintaining large deployments with many Integration Agents.
Advanced Bulk Actions
The Advanced bulk actions dialog allows you to update multiple agents in a single operation.
Supported bulk updates include:
- Name prefix – add a prefix to the names of selected agents.
- Name suffix – add a suffix to the names of selected agents.
- Name regex replace – rename agents using a regular expression pattern.
- Add tags – add one or more tags to all agents schedules.
- Remove tags – remove specific tags from agents schedules.
- Set tags – replace all existing tags with a new set.
Bulk operations help maintain consistent naming conventions and tagging across agents and simplify administration in large deployments.
Download and install the Integration Agent
Install the Integration Agent on Windows
Step 1. In Agentswindow select previously created Integration Agent.
Step 2. Click Downloadat the bottom of the screen.
Step 3. Select Windows OS. Click Agentbutton. It will download the Agent installer into your local machine.
Windows installer is provided as integrationagent.exe.
Step 4. Run the downloaded installer.
Step 5. Enter your Etlworks User ID (or email) and Etlworks instance URL.
Important: After installing the Agent you must install a license.
Step 6. Continue to Install a license.
Step 7. Verify that service is installed by opening the Services desktop app. There must be a service with the name IntegrationAgent and description Etlworks LLC. Integration Agent.
If IntegrationAgen service is not installed follow manual steps described here.
Install the Integration Agent on Linux
Step 1. In Agentswindow select previously created Integration Agent.
Step 2. Click Downloadat the bottom of the screen.
Step 3. Select Linux OS. Click Agentbutton. It will download the Agent installer into your local machine.
Linux installer is provided as a tar zip archive integrationagent.tar.gz. The archive contains required libraries and a command-line scripts.
Step 4. Create a folder for the agent in the hard drive, for example, /opt/agent, copy integrationagent.tar.gz file into that folder and then unarchive it.
sudo tar -zxvf integrationagent.tar.gzStep 5. cd to the folder, start the installation by executing:
sudo ./install.shImportant: After installing the Agent you must install a license.
Step 6. Continue to Install a license.
Install the Integration Agent as a Docker container
Read how to run Integration Agent as a docker container.
Install a license and start the Agent
Integration Agent requires a license.
To obtain and install the license:
Step 1. Open Agentswindow. Select the Agent to download the license for.
Step 2. Click Downloadat the bottom of the screen.
Step 3. Click License. The licenses for Windows and Linux are the same.
Step 4. Check if Agent is running:
Step 5. If Integration Agent is running stop Agent service.
Step 6. If exist delete files AGENT_HOME/license/*.alic and AGENT_HOME/license/*.chk. DO NOT DELETE AGENT_HOME/license/integration-agent-online.lic.
Step 7. Copy the new license file into the AGENT_HOME/license.
Step 8. Start Agent service.
Configure the Integration Agent to run as a Windows Service
Note: By default, the Windows installer already installs the Integration Agent as a Windows Service so this step is optional.
If you will ever need to re-install Integration Agent as a Windows Service here are the steps:
- Open elevated Command Prompt (Admin).
- cd into the directory where you have installed the agent, for example, cd c:\etlworks\integration-agent.
- Execute install.cmd.
- Verify that service is installed by opening the Services desktop app. There must be a service with the name IntegrationAgent and description Etlworks LLC. Integration Agent.
Troubleshoot installing Integration Agent as a Windows Service
If the service is not installed check the output of install.cmd.
It might contain the following error: 'wmic' is not recognized as an internal or external command.
The error 'wmic' is not recognized as an internal or external command occurs because wmic (Windows Management Instrumentation Command-line) is not available on your system.
To install wmic:
Step 1. Check if WMIC is Available
Before proceeding, confirm whether wmic is truly unavailable:
1. Open Command Prompt or PowerShell.
2. Type wmic and press Enter.
• If it works, the tool is installed.
• If it shows 'wmic' is not recognized, proceed to install it.
Step 2. Install WMIC via Add/Remove Windows Features
1. Open Settings:
• Press Win + I to open the Settings app.
2. Go to Apps:
• Navigate to Apps > Optional Features.
3. Add a Feature:
• Scroll down and click Add a feature.
4. Search for WMIC:
• Search for Windows Management Instrumentation (WMI) or WMI Tools in the list.
5. Install:
• Select it and click Install.
6. Restart Your Computer (if required):
• After installation, restart to ensure it works.
Step 3. Execute install.cmd again and verify that the service has been successfully installed.
Configure the Integration Agent to run as a Linux Service
Note: By default, the Linux installer already installs the Integration Agent as a Linux Service so this step is optional.
If you will ever need to re-install Integration Agent as a Linix Service here are the steps:
- Open terminal.
- cd into the directory where you have installed the agent, for example, cd \opt\agent.
- Execute sudo.\install.sh.
Update Service
When Windows or Linux installer installs the Agent it also installs the UpdateService. The UpdateService can be used to remotely start, stop, restart, update and reconfigure the Agent from Etlworks UI.
If you are on version of Agent above or equal to 5.9.0-SNAPSHOT but below 6.3.4-SNAPSHOT you must download and install UpdateService. Agent installer version 6.3.4-SNAPSHOT and above comes bundled with the UpdateService.
Install Update Service
Here is how to download and install the UpdateService:
Step 1. Click Download button.
Step 2. Select OS and click Update service.
Step 3 (Windows). Windows installer is provided as updateservice.exe.
Run the downloaded installer.
Important: Make sure it install into the same folder as Agent.
The installer will install all file and start the UpdateService.
To verify that UpdateService is running open the Services desktop app. There must be a service with the name EtlworksUpdateService and description Etlworks LLC. Update Service.
Step 3 (Linux). Linux installer is provided as updateservice.tar.gz.
Important: Unarchive the file into the same folder as Agent.
sudo tar -zxvf integrationagent.tar.gzStep 4. cd to the folder, start the installation by executing:
sudo ./update-service-install-and-start.shThis will install all file and start the UpdateService.
Step 5. Verify that UpdateService is running
1. Click Status button
2. Check the Updater status.
Manually start, stop, install and remove Update Service
Once installed, the Update Service will persist through machine restarts, as it is configured to automatically start on reboots. You can manually start, stop and remove he service using provided scripts.
Manage Update Service on Windows
Stop
- Open elevated Command Prompt (Admin).
- cd into the directory where you installed the agent, for example cd c:\integration-agent.
- Execute update-service-stop.cmd.
Start
- Open elevated Command Prompt (Admin).
- cd into the directory where you installed the agent, for example cd c:\integration-agent.
- Execute update-service-start.cmd.
Remove service
- Open elevated Command Prompt (Admin).
- cd into the directory where you installed the agent, for example cd c:\integration-agent.
- Execute update-service-remove.cmd.
Install service
- Open elevated Command Prompt (Admin).
- cd into the directory where you installed the agent, for example cd c:\integration-agent.
- Execute update-service-install.cmd.
Install and start service
- Open elevated Command Prompt (Admin).
- cd into the directory where you installed the agent, for example cd c:\integration-agent.
- Execute update-service-instal-and-start.cmd.
Manage Update Service on Linux
Stop
- Open terminal.
- cd into the directory where you installed the agent, for example cd \opt\agent.
- Execute sudo.\update-service-stop.sh
Start
- Open terminal.
- cd into the directory where you installed the agent, for example cd \opt\agent.
- Execute sudo.\update-service-start.sh
Install service
- Open terminal.
- cd into the directory where you installed the agent, for example cd \opt\agent.
- Execute sudo.\update-service-install.sh
Install and start service
- Open terminal.
- cd into the directory where you installed the agent, for example cd \opt\agent.
- Execute sudo.\update-service-install-and-start.sh
Manage Agent from Etlworks UI
It is possible to remotely start, stop, restart, update and reconfigure the Agent from Etlworks UI. This requires the UpdateService which must be installed and running.
Note: The Integration Agent is not configured to start automatically; it needs to be manually started using the UI or a command line script after the installation and machine restart.
When the user triggers any action, such as Stop, Start, Restart, etc. the action is added to the queue. The actions in a queue are executed in order on the next communication session between the UpdateService and host Etlworks instance. It can take up to a few minutes for the action to complete. Read about Actions Queue.
Start Agent
The Agent can be remotely started if it is not running. It can take up to 120 seconds to start the agent.
1. Click Status button
2. If available click Start button
3. Wait until the status changes to Online
Stop Agent
The running Agent can be remotely stopped if it is not running. It can take up to 120 seconds to stop the agent.
1. Click Status button
2. If available click Stop button.
3. Wait until the status changes to Offline.
Restart Agent
The Agent can be remotely restarted if it is running or started if it is not running. It can take up to 120 seconds to restart the agent. If there is an update in the /update folder the restart will install the update.
1. Click Status button
2. If available click Restart button.
3. Wait until the status changes to Offline followed by Online
Change maximum memory available to the Agent
It is possible to remotely change the maximum memory available to the Agent.
1. Click Status button
2. Navigate to Memory Max and click Configure button.
3. Enter Max available memory in megabytes or set it to auto to set the max memory to 70% of overall system RAM. Click Update button.
4. Wait until the update service reconfigures the Agent, and status changes to Offline followed by Online
5. Verify that the memory configuration has changed by opening the Status screen and navigating to Memory Max line.
Download Logs
There are two log files:
- Agent Log: The primary log file of the Integration Agent, containing errors and warnings related to the execution of flows on the Agent.
- Updater Log: The log file for the Update Service, detailing user interactions with the service, including starting, restarting, and updating the Agent.
To download logs click Agent log or Updater log button.
Wait until the the system will display a Download button. Once available click the Downloadbutton.
Manage Agent using command line scrips
Manage Agent on Windows
Start
- Open elevated Command Prompt (Admin).
- cd into the directory where you installed the agent, for example cd c:\integration-agent.
- Execute start.cmd.
Stop
- Open elevated Command Prompt (Admin).
- cd into the directory where you installed the agent, for example cd c:\integration-agent.
- Execute stop.cmd.
Remove service
- Open elevated Command Prompt (Admin).
- cd into the directory where you installed the agent, for example cd c:\integration-agent.
- Execute remove.cmd.
Install service
- Open elevated Command Prompt (Admin).
- cd into the directory where you installed the agent, for example cd c:\integration-agent.
- Execute install.cmd.
Install and start service
- Open elevated Command Prompt (Admin).
- cd into the directory where you installed the agent, for example cd c:\integration-agent.
- Execute instal-and-start.cmd.
Change JRE and JVM memory parameters for Windows service
The Windows version of Agent is bundled with the JRE (Java Runtime Environment). JRE and JVM memory parameters are configured in AGENT_HOME/install.cmd.
set JAVA_HOME=%PR_PATH%\jre
set PR_JVM=%JAVA_HOME%\bin\server\jvm.dll
set PR_JVMOPTIONS=-Xmx8000m
You can change the JRE to any valid JRE installed in the machine (it must be Java 8).
Similarly, you can also change the maximum memory that the JVM can allocate. The default is auto which sets the RAM to 70% of total system RAM.
Change JVM memory parameters
Here's how you can do this:
- Stop the Agent.
- Modify PR_JVMOPTIONS in AGENT_HOME/install.cmd and save it. You can set it to any of the following:
- The max memory in megabytes: PR_JVMOPTIONS=8000
- The valid -Xms parameter: PR_JVMOPTIONS=-Xmx8000m
- auto which sets the RAM to 70% of total system RAM: PR_JVMOPTIONS=auto
- Run AGENT_HOME/remove.cmd
- AGENT_HOME/install.cmd
- Start the Agent.
Manage Agent on Linux
Start
- Open terminal.
- cd into the directory where you installed the agent, for example cd \opt\agent.
- Execute sudo.\start.sh.
Stop
- Open terminal.
- cd into the directory where you installed the agent, for example cd \opt\agent.
- Execute sudo.\stop.sh.
Install service
- Open terminal.
- cd into the directory where you installed the agent, for example cd \opt\agent.
- Execute sudo.\install.sh
Install and start service
- Open terminal.
- cd into the directory where you installed the agent, for example cd \opt\agent.
- Execute sudo.\install-and-start.sh
Change JVM memory parameters for Linux service
The Linux installer automatically install Java 1.8 using OpenJdk for a specific version of Linux. JRE and JVM memory parameters are configured in AGENT_HOME/install.sh.
MAX_MEM_OVERRIDE_VALUE=autoTo modify JVM memory parameters:
- Stop the Agent.
- Modify MAX_MEM_OVERRIDE_VALUE in AGENT_HOME/install.sh and save it. You can set it to any of the following:
- The max memory in megabytes: MAX_MEM_OVERRIDE_VALUE=8000
- auto which sets the RAM to 70% of total system RAM: MAX_MEM_OVERRIDE_VALUE=auto
- Execute sudo./install.sh
- Start the Agent.
Run the Integration Agent as a standalone app
Typically the Integration Agent runs as a Windows or Linux service. It is however possible to run as a standalone application.
Windows
- Open elevated Command Prompt (Admin).
- cd into the directory where you installed the agent, for example cd c:\integration-agent.
- Execute integrationagent.exe standalone.
Cross-platform (Linux, MacOS, Windows)
Make sure that the default Java version is Java 1.8. To confirm, run java -versionin the terminal. The output should be Java(TM) SE Runtime Environment (build 1.8.0_build).
- Open terminal.
- cd into the directory where you installed the agent.
- Execute java -jar integrationagent.jar standalone.
Change JVM memory parameters for standalone app
JVM memory parameters are configured in AGENT_HOME/appstart.properties.
app.main.class=com.toolsverse.agent.IntegrationAgent
app.libs.dir=./lib
app.vm.options=-Xms100m -Xmx8000m
app.follow=true
You can change the maximum memory that the JVM can allocate. The default is 4000 MB, which might not be enough if you are going to process large datasets.
Here's how you can do this:
- Stop the Agent
- Modify AGENT_HOME/appstart.properties and save it.
- Start the Agent
Update the Integration Agent
Integration Agent support automatic updates directly from the Etlworks UI. The update process downloads the selected version, installs it, and restarts the Agent automatically.
Agent updates are performed using the Agent Updater service, which runs on the machine where the Agent is installed.
Update One or Multiple Agents
Step 1. Select one or multiple Agents and click bulk update button
Choose one or more Agents.
Click the Bulk Update button in the toolbar.
This opens the Bulk Agent Update dialog.
Step 2. Select the version
Choose the version to install.
The dialog also displays the release timestamp a link to Release Notes
Step 3. Review validation results
Before starting the update, Etlworks validates all selected Agents.
Agents may be marked as:
- Eligible – ready for update
- No update required – already running the selected version
- Agent is offline – cannot be updated automatically
Only eligible Agents will be updated.
Step 4. (Optional) Download validation report
Click Download CSV to download the eligibility report.
The file contains:
- Agent name
- Current version
- Target version
- Eligibility status
This is useful for auditing and troubleshooting before running updates.
Step 5. Run the update
Click Update Eligible Agents.
Each Agent downloads the update package and restarts automatically.
Step 5. Verify the update
After the update completes:
- The Agent status returns to Online
- The new Agent version appears on the Agent card
Agent update reports
All update requests are stored and can be reviewed later.
Access reports
Use the Agent update request reports button in the Agents toolbar.
What you can do
- View current and past update requests
- See detailed results per Agent
- Expand individual requests
- Download reports as CSV
Notes
- You can view up to 10 update requests at a time (configurable)
- Reports are retained based on configurable TTL (time-to-live)
Configure report retention
Report retention settings are available in:
Settings → Agents
Options include:
- Number of stored update requests
- Retention period (TTL in days)
Agent Update Requirements
Automatic updates require:
- Agent version 6.3.4-SNAPSHOT or newer
- Updater service installed
- Updater Status: running Agent Online
Agents that are offline or missing the updater service cannot be updated automatically.
Agent status indicators
The Agents screen displays:
- Agent Status (Online / Offline)
- Updater Status (Running / Stopped / current activity)
Updater status now also shows what the updater is currently doing.
Available in:
Card view
Table view
Troubleshooting Agent Updates
The Agent dashboard displays two important statuses:
- Agent Status – Online or Offline
- Updater Status – Running or Stopped
Use the following guidelines when troubleshooting updates.
Agent Offline, Updater Running
Start the Agent from the UI and retry the update.
If the Agent cannot be started from the UI, start it manually and retry.
Agent Offline, Updater Stopped
Verify that the Updater service is installed and running.
Start the updater service, then start the Agent and retry the update.
Agent Online, Updater Running, but update fails
Try stopping and restarting the Agent from the UI and initiate the update again.
If the problem persists, review the updater log and contact support.
Configure the Integration Agent
After installing the Integration Agent, it is fully functional and ready to go.
Later you can configure notifications, monitoring, and other parameters.
To configure the Etlworks Agent:
Step 1. In Agentswindow select previously created Integration Agent.
Step 2. Select the Parameters tab.
Step 3. Modify parameters and click the Save button. If the Agent is running, it will reconfigure itself at runtime. If the Agent is not running it will apply configuration changes on the next restart.
Configuration parameters
This group of parameters is used to configure the SMTP sender, which sends email notifications on specific events.
- SMTP Host: SMTP Hostname that should be used to send emails from the agent.
- SMTP Port: SMTP Port that should be used to send emails from the agent.
- SMTP User: SMTP User that should be used to send emails from the agent.
- SMTP Password: SMTP Password that should be used to send emails from the agent.
- FROM: the email address that will be used to send emails from.
- TO: the comma-separated list of email addresses that should receive notifications.
- CC: the comma-separated list of email addresses that should be added to CC.
- BCC: the comma-separated list of email addresses that should be added to BCC.
- TLS Enabled: switch the connection to a TLS-protected.
Notifications
Use this group of parameters to enable email notifications for specific events.
Note: The SMTP sender must be configured.
- On Success: if this parameter is enabled and the SMTP sender is configured the agent will send email notification on each successful flow execution.
- On Fail: if this parameter is enabled and the SMTP sender is configured the agent will send an email notification on each failed flow execution.
- On Shutdown: if this parameter is enabled and the SMTP sender is configured the agent will send email notification on shutdown.
- On License Issue: if this parameter is enabled and the SMTP sender is configured the agent will send an email notification on any issue related to the license verification.
- On Status Change: if this parameter is enabled and the SMTP sender is configured the agent will send email notification on any status change, including reaching and clearing dangerous thresholds.
HTTP Proxy
The HTTP Proxy configuration parameters enable the Integration Agent to route HTTP traffic through a proxy server, allowing for secure and controlled access to external networks. Below is an explanation of each parameter:
Proxy Host
Specifies the hostname or IP address of the proxy server through which HTTP traffic is routed. This is a mandatory setting if a proxy is used.
Proxy Port
Specifies the TCP port on which the proxy server (defined in the Proxy Host property) is running. Ensure this is a valid positive number.
Proxy User
The username of an account registered with the proxy server. This is required if the proxy server enforces user authentication.
Proxy Password
The password associated with the user account specified in the Proxy User property. This ensures secure access to the proxy server.
Proxy Auth Scheme
Defines the authentication scheme used to authenticate with the proxy server. Supported values include http, https, and ntlm. Ensure you select the appropriate method based on your proxy configuration.
Proxy Exceptions
A comma-separated list of hostnames or IP addresses that should bypass the proxy server. Use this to exclude specific destinations from being routed through the proxy.
These parameters collectively provide flexibility and control over how HTTP traffic is routed through a proxy server, ensuring secure and efficient communication for the Integration Agent. Configure these properties in your agent’s settings as needed.
Web Server
This group of parameters is used to configure the Web Server embedded into the Integration Agent. The Web Server is used to display the Integration Agent dashboard when running the Agent on-premise.
- Web Server Enabled: enable or disable the embedded webserver.
- Host: the webserver hostname or IP address.
- Port: the webserver port number.
Monitoring
This group of parameters is used to set warning and critical thresholds (in %) for the health status of the agent.
- Memory Utilization High Threshold (%): once memory utilization reaches configured in this field threshold the agent's status will be changed to warning. The default is 80%.
- Memory Utilization Critical Threshold (%): once memory utilization reaches configured in this field threshold the agent's status will be changed to critical. The default is 90%.
- Error Ratio High Threshold (%): once the number of errors compared to successful executions reaches configured in this field threshold the agent's status will be changed to warning. The default is 10%.
- Error Ratio Critical Threshold (%): once the number of errors compared to successful executions reaches configured in this field threshold the agent's status will be changed to critical. The default is 25%.
Logging
This group of parameters is used to configure how the Integration Agent uploads logs to the cloud Etlworks.
- Upload console log files: if this parameter is enabled the Agent uploads each Flow executing log to the cloud Etlworks. The parameter is disabled by default. The console logs can be viewed in the Flow Statistics dashboard.
- Maximum log file size to upload (MB): log files with size over a specified amount in MB will not be uploaded. Note that this configuration can be limited by outside factors, such as the file upload limit set on the network proxy side.
Miscellaneous
This group of parameters is used to configure time-outs.
- Shutdown time out (ms): the shutdown time out is how long the Integration Agent waits for the running flows to finish before it initiates the shutdown sequence. Encreasing the timeout will give running flows more time to finish but will increase the agent's shutdown time. Note that prior to shutting down the Agent will attempt to cancel currently running flows. Most flows will stop almost immediately but if the flow is busy it can take minutes. The default value for this parameter is 300000ms which is 5 minutes.
- Agent Ping Delay (seconds): the amount of delay in seconds between consecutive calls from the Agent to Etlworks instance to get the latest configurations and report status. Decreasing the value of this parameter will make the Integration Agent more responsive but will increase the chatter between the Agent and Etlworks instance. The default value for this parameter is 1 minute.
Reupload flow stats and logs
Integration Agents will automatically reupload statistics and logs for flows executed during host instance downtime. Additionally, webhook notifications will be triggered if they are configured.
To prevent a scenario where hundreds of agents simultaneously send updates for previously executed flows, the following properties have been introduced. These measures aim to mitigate the risk of overwhelming the host instance, which could lead to instability or crashes:
- Failed audit upload check delay (minutes): Specifies the delay in minutes between consecutive attempts to resend flow execution audit data. Note that the initial delay after the agent starts is always 3 minutes.
- Failed audit re-upload throttling (seconds): Defines the delay in seconds between consecutive re-uploads of flow execution audit data. This setting ensures a controlled and gradual submission of data.
Check the version of the Agent
Step 1. Open Agentswindow.
Step 2. Click the Agent link
The version of the Agent is displayed on top of the screen.
Starting from 5.9.0-SNAPSHOT version of Agent is synchronized with the version of the app. Our automatic Agent update workflow checks the compatibility between the Agent and the main app.
Monitor the Integration Agent
Note: Agent's status
Note: Each running Integration Agent reports status to the host Etlworks once a minute. UseNote: Agent Ping DelayNote: to change the frequency.
The status of the specific Integration Agent is displayed in the grid under the STATUS column.
Available statuses
- Offline: the Agent is offline (not running)
- Online: the Agent is online (running and the scheduler is enabled).
- Online (suspended): the Agent is online but the scheduler is suspended, hence no Flows can be executed automatically by the Agent. It is still possible to execute Flows manually.
Agent's Dashboard
The Agent's Dashboard displays information about various statuses, scheduler, JVM, and running flows.
To open the Agent's Dashboard click status link in the Agents window.
The status of the Agent recorded during the latest communication session will be displayed in the popup window.
Agent logs
There are two log files:
- Agent Log: The primary log file of the Integration Agent, containing errors and warnings related to the execution of flows on the Agent.
- Updater Log: The log file for the Update Service, detailing user interactions with the service, including starting, restarting, and updating the Agent.
Email notifications
Notifications can be sent by the Agent or by the Etlworks instance.
Configure Agent to send email notifications
You can configure the following email notifications. To receive notifications the SMPT email sender must be configured.
- On Success: if this parameter is enabled and the SMTP sender is configured the agent will send email notification on each successful flow execution.
- On Fail: if this parameter is enabled and the SMTP sender is configured the agent will send an email notification on each failed flow execution.
- On Shutdown: if this parameter is enabled and the SMTP sender is configured the agent will send email notification on shutdown.
- On License Issue: if this parameter is enabled and the SMTP sender is configured the agent will send an email notification on any issue related to the license verification.
- On Status Change: if this parameter is enabled and the SMTP sender is configured the agent will send email notification on any status change, including reaching and clearing dangerous thresholds.
Configure Etlworks instance to send email notifications
Step 1. Make sure the SMTP sender is configured under Configuration->Email.
Step 2. Click Configure flow notifications.
Step 3. Enable notifications and enter the email address(s) to receive notifications.
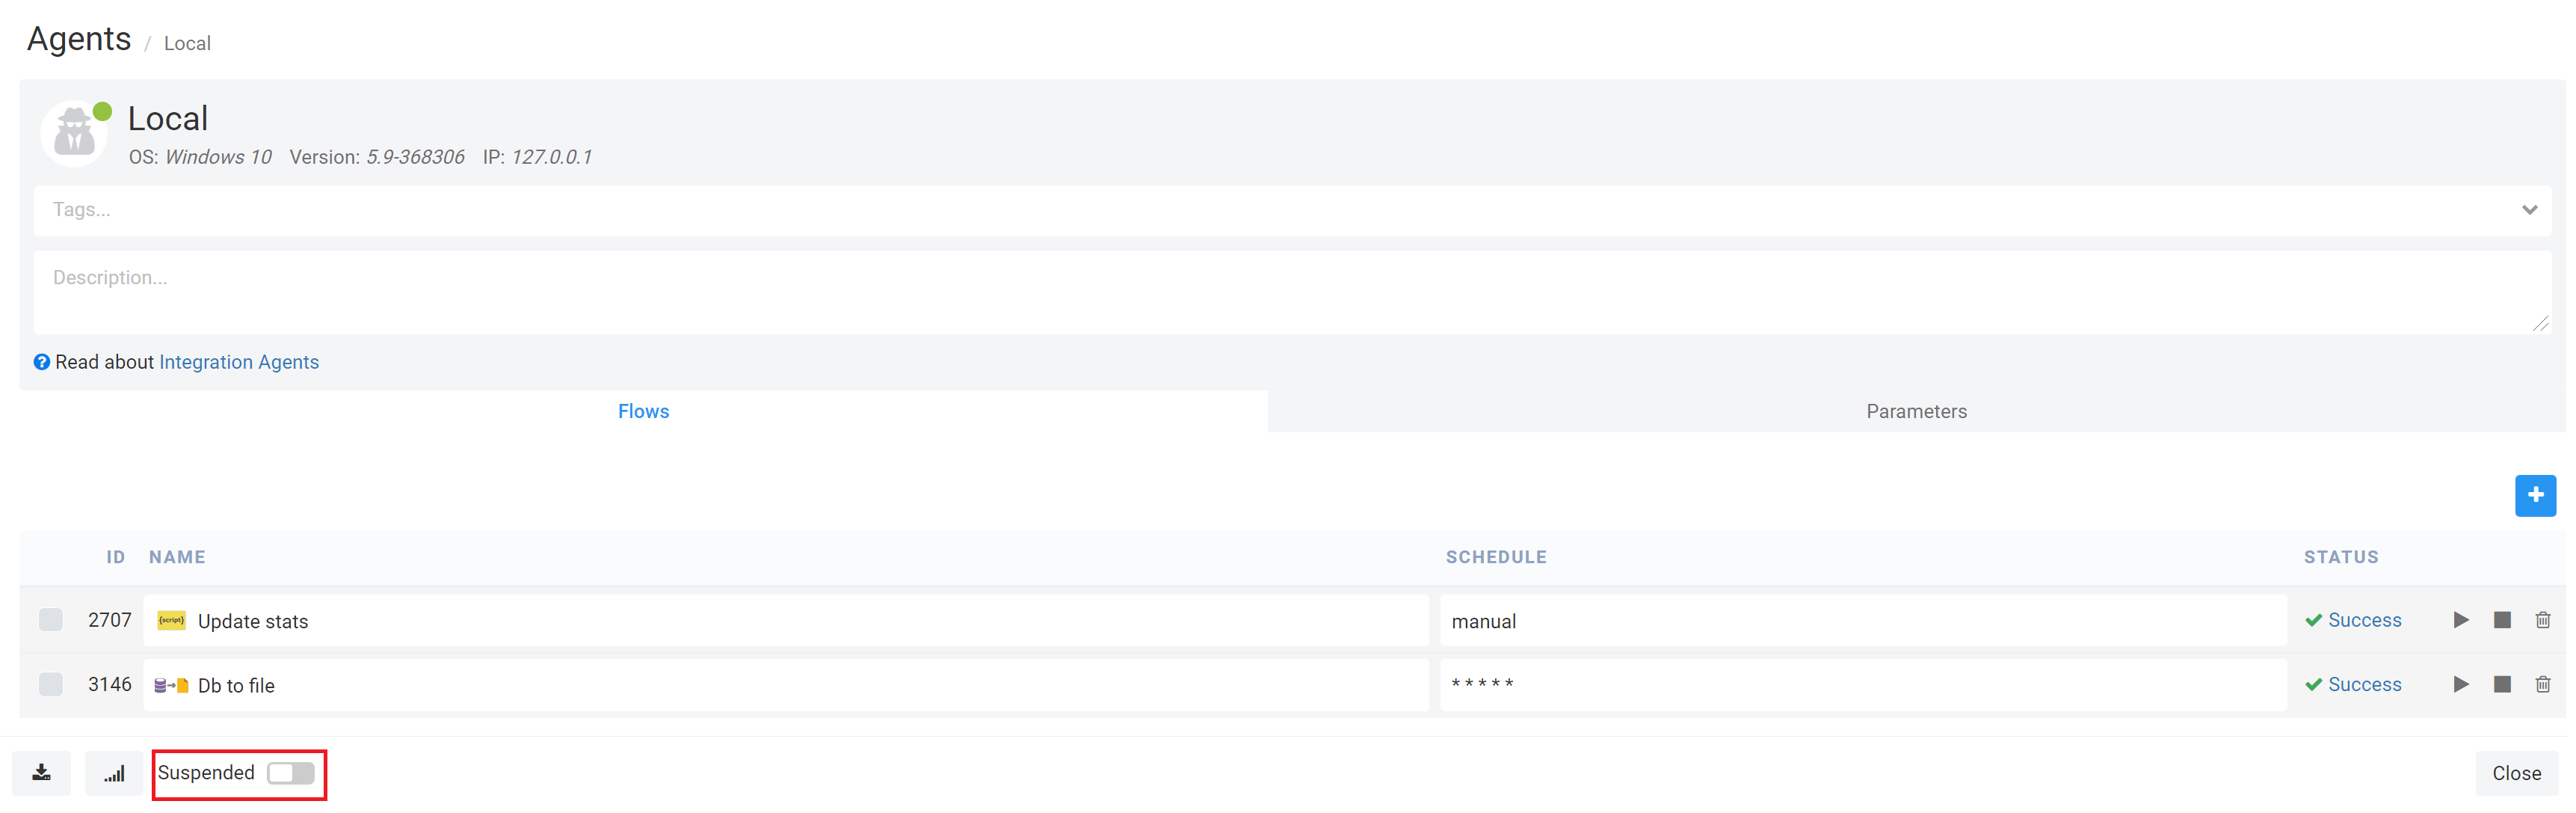
Suspend the Integration Agent
The Integration Agent can be suspended. In this mode, the Agent is running but no Flow can be executed automatically by the scheduler. Note that in this mode it is still possible to execute Flows manually. Use this mode to debug issues with the Agent.
To suspend the Agent:
Step 1. In Agentswindow select previously created Integration Agent.
Step 2. Enable Suspended at the bottom of the screen. Click Savebutton.
 Actions Queue
When the user triggers any action, such as Run Flow, Stop Flow, Stop Agent the action is added to the queue. The actions in a queue are executed in order on the next communication session between the Agent and Etlworks.
View Actions
If there are actions in a queue the View Actions button becomes green.
Click the button the see the actions.
From there you can:
- Remove the action from the queue.
- Check the estimated time when the top action in a queue will be executed.
Configuring Scheduled Agent Restarts for Optimal Performance
Periodic restarts of an agent can help maintain optimal performance and stability, especially in high-demand environments. Over time, agents handling intensive data integration tasks may experience memory usage buildup, temporary file accumulation, or minor configuration drifts that can impact efficiency. A scheduled restart clears memory, refreshes connections, and resets processes, reducing the chance of unexpected slowdowns or issues. This proactive approach ensures the agent remains responsive and performs consistently, minimizing potential downtime and the need for manual intervention.
Prerequisite: Ensure Updater Service is Active
To configure a scheduled restart of the agent on a daily or custom cadence, ensure the updater service is installed and online. You can verify this by accessing the agent’s dashboard.
Restarting the Agent On-Demand via API
If you need to restart the agent immediately or on demand, you can trigger a restart programmatically using an API call to the host instance. This approach is ideal for situations where you need to control the agent remotely or incorporate restart actions into automated processes.
API Endpoint:
POST /rest/v1/agents/{agentId}/actions
Headers:
Authorization: [your auth token]. Read more about Authentication API.
Payload:
{
   "action": "agent.restart"
}
This API call sends a restart command to the specified agent. This approach provides flexibility for on-demand restarts without the need for a scheduled task.
Scheduling Regular Agent Restarts via Scripting Flow
To set up a scheduled restart for the agent, you can create a scripting flow with the code below. This approach is useful for ensuring regular restarts to maintain optimal performance.
Step 1. Create the Scripting Flow: Use the following code to configure a scheduled restart flow:
// Import Java classes for file handling
var File = Java.type("java.io.File");
var FileWriter = Java.type("java.io.FileWriter");
var BufferedWriter = Java.type("java.io.BufferedWriter");

// Get the data folder path
var dataFolder = new File(com.toolsverse.config.SystemConfig.instance().getDataFolderName());

// Get the parent directory (agent's root)
var agentsRoot = dataFolder.getParentFile();

// Define the file to create in agent's root with the name "command"
var commandFile = new File(agentsRoot, "command");

// Create and write to the file
var writer = new BufferedWriter(new FileWriter(commandFile));
writer.write("restart");
writer.close();

// Log the name of the created file
etlConfig.log("Command File created: " + commandFile.getAbsolutePath());
Step 2. Configure the Flow’s Schedule: Add this flow to the agent and configure it to run at the desired interval (e.g., once a day). This script creates a command file with the instruction to “restart,” which will be detected by the updater service, prompting the agent to restart automatically based on your configured schedule.
Each of these methods enables agent restarts, either on-demand or on a regular cadence, helping maintain the agent’s performance and stability.
Installing connectors
Etlworks comes with hundreds of built-in connectors to meet a wide range of integration needs. However, it is also possible to add new regular or premium connectors as needed. Multiple connectors can be installed into the same folder under AGENT_HOME/jdbc. This section provides step-by-step instructions for installing both types of connectors on the machine running the Integration Agent.
Installing Regular Connectors
Step1. Obtain the connector: Contact Etlworks support to obtain the connector. It will be provided as a.jar file and may include a license file or other required files.
Step 2. Create a folder if needed: Create a folder with any name (e.g., ext) in the AGENT_HOME/jdbc directory. You can install multiple connectors into the same folder.
Step 3. Copy the files: Copy all files obtained from Etlworks support to the newly created folder.
Step 4. Restart the Integration Agent: Restart the Integration Agent to apply the changes.
Installing Premium Connectors
Step1. Obtain the connector: Contact Etlworks support to obtain the connector. It will be provided as a.jar file along with a license key. If a license key is not provided, you can install a trial license.
Step 2. Create a folder if needed: Create a folder with any name (e.g., ext) in the AGENT_HOME/jdbc directory. You can install multiple connectors into the same folder.
Step 3. Copy the files: Copy the.jar file obtained from Etlworks support to the newly created folder.
Step 4. Navigate to the folder: Open a terminal and navigate (cd) to the newly created folder.
Step 5. Run the license activation command
For Windows: Execute the following command:
../../jre/bin/java -jar connector.jar -licenseReplace connector.jar with the actual name of the file you received from Etlworks.
For Linux: Execute the following command:
java -jar connector.jar -licenseReplace connector.jar with the actual name of the file you received from Etlworks.
Step 6. Provide the required information:
When prompted, enter the following:
- Name: support
- Email: support@etlworks.com
- License key: Enter the license key provided by Etlworks or type TRIAL for a trial license.
Step 7. Verify that license file successfully generated:
The license file name should match the connector file name, but with the.jar extension replaced by.lic.
For example, if the connector file is cdata.jdbc.salesforce.jar, the license file should be named cdata.jdbc.salesforce.lic.
Step 8. Restart the Integration Agent.
Handle cases where the license file is not generated
Occasionally, the installer fails to generate the license file (including trial licenses). In this case, the output of the installer will provide a link to download the license file. Here is the step-by-step instruction for installing the license manually.
Step 1. Copy the link and open it in any browser. Follow the on-screen instructions to download the license file.
Step 2. After downloading the file, rename it to match the connector file name, replacing the.jar extension with.lic.
For example, if the connector file is cdata.jdbc.salesforce.jar, the license file should be named cdata.jdbc.salesforce.lic.
Step 3. Copy lic file to the same folder where copied the connector.
Step 4. Restart the Integration Agent.